The first thing I did was make a rough draft on lined notebook paper. I did it on notebook paper because we were running low on computer paper. I had read Watchmen for our class, and one thing I really liked that Dave Gibbons did was make a solid image on one page, or a splash as it would be called in comics world, then he would panel it out and show a progression of people moving. This was just a more creative way to do a conversation sequence. It was much more effective than a head with a talking bubble. So, I wanted to try it for myself. I'm not exactly sure why I chose Arlington Cemetery, or why the subject matter, but I really liked how the rough draft came out.
Here is the Rough Draft, you can click on the image to make it larger.

After I had made a pleasing rough draft, I started working on the pencil version of the comic. I outlined the size of the page, then I drew the whole splash image. Then I sectioned it off into 3 equally sized panels, and erased anything in between.
This is the Final Penciled Version. Click to Enlarge

The Next Step in the Process is to take the penciled version, and ink it. I liked the pencil version a lot, and I didn't want to ruin it by drawing over it with pen. So I made a hodgepodge lightbox and traced it with a blue pencil. Then I traced over that with various thicknesses of pen. I also used some different shades of black and grey for the people.
This is the final inked version of the picture. Click to enlarge (of course)

Not a lot of difference between this and the penciled version other than the facial features in the closest people, and all lines are darker.
After this, the next step is to color it. To do this, I just scanned the image into my computer, and worked on it in photoshop. I'll spare you the details, and show you the final result.

You know the drill about making it bigger.
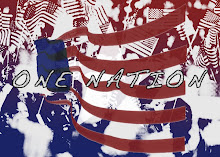
Ok so now on to the final result. All I had to do was add the lettering. I tried a few methods for this, but the best I found was a program called Comic Life. It's made so you can add captions and word bubbles to your own pictures, but they are really good bubbles and captions, so I used them for my comic. This is what I got.

Click and make it bigger, check it out, and let me know what you think please. I hope you enjoy it. It's short, but I think it's not bad and pretty powerful.
Until next time
Peace,
Jake